
You are using discord very often but your main servers are lacking of features? Its time to write them by yourself!#
When starting with discord bot development, you will always get some touchpoints with JavaScript. But how do you overcome such a language barrier when you are a .NET developer or need real typization?
If you are a semi-professional, beginner or professional C# developer, you maybe want to try to develop the bot with .NET 6 and you will find some packages which give you the possibility to do so. I’ve started with Discord.Net which fits pretty well and performed great in my demos. It is frequently updated and maintained.
In the following example I will build a discord bot from scratch, which will have a simple greeting command.
Generate your own discord bot application#
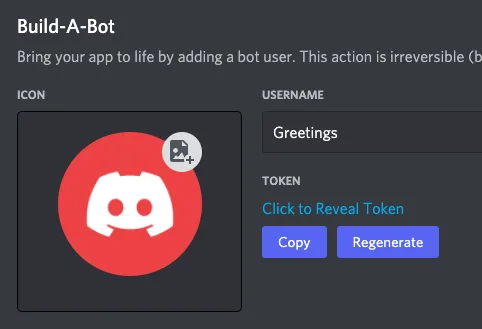
Before we are starting to create a .NET application, we will need to acquire a bot token from discord for our bot. This is solved via the discord developer portal. In the discord developer portal applications tab we can click New Application in the upper right corner which will open a dialog where we can put in the name of discord application. After we created the discord application, we need to create a bot for our application. This can be achieved by clicking at the left on bot and create a bot for our application. The generation was successful when the message A wild bot has appeared! is visible. Your bot token is directly under the name of the bot and can be copied. Take care, your bot token should be a secret!
Basic .NET Console Application Setup#
Basic .NET Console Application Setup#
First of all, we need to create the basic .NET console application setup. Create a console application which will initial have a Program.cs file.
We now add NuGet references to two packages. First of all we will need Discord.Net. I think this reference is pretty obvious. To make our project more comfortable, we will also add the Microsoft.Extensions.DependencyInjection package. As this will provide us the “new” best practice of Microsofts Dependency Injection.
Getting started to get our bot online#
To get our bot online, there are a few steps to do, but in my opinion, it’s pretty more fast forward, as it’s in JavaScript. As we are in need to do some asynchronous calls for initialization, we will write an asynchronous main method which can be awaited, let’s call it MainAsync .
Initial Program.cs
So our entry point of our console application should be the Main method, which then calls our asynchronous main method which should never return as the method should wait forever. As the comment in the code block states, this needs to be done to stay connected with our bot.
For general initialization (for example, a bootstrapper), we can also make use of the default constructor of the Program class. I also put the initialization of the DiscordClient class there.
We got some things to speak about now:
Which Discord client to use?#
Discord.Net provides us with many implementations of the discord client. I would always suggest to use the DiscordShardedClient . Sharding is required for discord bots, which should grow up to handle a lot of guilds (servers).
What is sharding?#
In the discord context sharding basically means, splitting one instance up to at most 1000 guilds (discord servers). Normally you won’t need some special things to do when starting with your bot. But as I always say, forewarned is forearmed. And if we are honest, we want our bot to be successful.
Bot token, do not keep it in the code#
For simplification purposes, you could put the bot token into the code, which should normally NEVER BE DONE. Better take it from the config file, like in the sample I’ve provided. This can be achieved by referencing the ConfigurationBuilder and adding a appsettings.json file to your project. Don’t forget to set the build action of the file to Content and Copy always to achieve that the file is beeing copied to the output directory of your application build process.
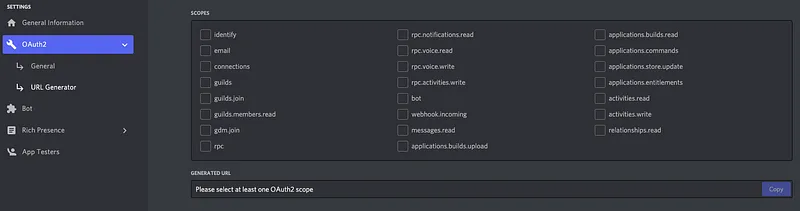
Our bot should now be ready to connect to servers which invited him. In the discord developer portal at your bots page, you can go to OAuth2 → URL Generator you can select your scope (bot ) and permissions (send messages, read message history ) of the bot and generate the invitation link:
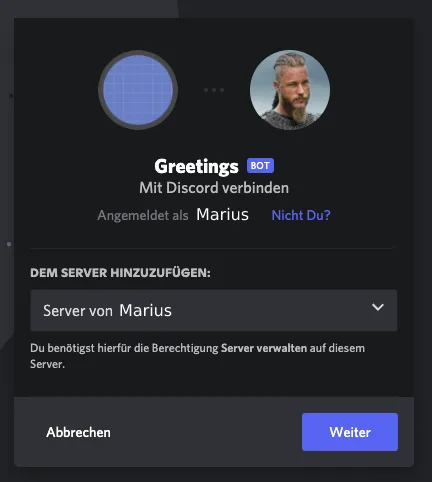
Putting the generated link into your browser will redirect you to a page where to choose which server your bot should be invited too. You can only select between servers, where you got the permission to add/invite people to.
When starting your discord bot via command line, you should be able to see the bot coming online at the server you invited him to.
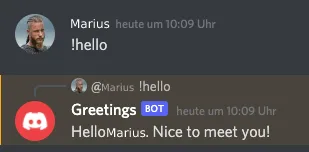
After that we will enhance our bot with a sample command, which will listen to !hello and reply with a specified greetings message.
With Discord.Net it’s pretty simple to add a command to your bot. We create a folder Modules and also create a file ExampleCommands.cs in the folder.
ExampleCommands.cs
After we told the bot, what to do with a specific command, we need to let him know, how to identify commands, this should be done in a CommandHandler.cs .
Sample CommandHelper.cs
We are pulling the CommandService via dependency injection. The function HandleCommandAsync is bailing out the system and bot messages and checking if the message begins with a ! to identify if the message should be a command. Discord.Net will internally check if the command name prefixed by the ! is in any of the referenced modules and executes the command.
After that, we can enhance our Program.cs to take the CommandHandler to handle our commands. We also need to give our IOC a reference to an instance of the CommandService of Discord.Net.
If you followed all steps, you should be able to start your own discord bot and execute the !hello command via discord. There are much more things you can do and react to with your discord bot, check it out.
Summary#
Generating a bot with .NET 6 and Discord.Net is pretty fast forward. If you need some help, do not hesitate to comment this blog post and I will try to respond as fast as possible.
Source code of this sample can be found here.