
Getting Started with Blazor WebAssembly Hosted on .NET 9#
Recently, we had the chance to dive into Blazor hosting models on .NET 9 to evaluate options for a new web app. Don’t worry if you’re still on .NET 8 — the steps here are compatible with .NET 8 as well, but .NET 9 brings some nice WebAssembly enhancements that are worth noting.
Our goal was to build a solution deployable on Azure as a single, robust web app — ideally without the need for multiple deployments or overly complex configurations. To meet our business requirements, the app also needed to be secure, scalable, and cost-effective, so we aimed to host it behind Azure Front Door. To optimize for Azure pricing, we also prioritized compatibility with Linux hosting.
However, there’s a catch: while I’m a big fan of Blazor Server-Side Rendering (SSR) for its efficiency and simplicity, Azure Front Door doesn’t yet support WebSockets, which SSR depends on. This effectively ruled out Blazor SSR for us, at least for applications designed for public web access. If you’re in the same situation and hoping for this support, here’s the current feature request from Microsoft, and I’d recommend checking out this insightful post from my colleague Thomas for more on the topic.
With SSR out of the running, we still needed a robust backend component and well-structured architecture, so standalone Blazor WebAssembly wasn’t ideal either. The winner? Blazor Hosted WebAssembly! This model provides both a client and a server project while compiling down to a single deployable executable — perfectly aligned with our Azure infrastructure needs.
Setting Up Blazor WebAssembly Hosted on .NET 9#
Let’s get our Blazor WebAssembly Hosted app up and running. You can do this with Rider or straight from the command line (my personal favorite!). I recommend generating the sample pages as they give a nice layout of where things live in the app and how the pieces connect.
When you’ve generated the project, you only need to run the Server project — this will automatically serve the WebAssembly client as well. As you access the page, you’ll notice the WebAssembly code is downloaded to the browser, and the program structure is familiar if you’ve used .NET before, making it easy to customize.
Creating the Project#
Use the following command to generate your Blazor WebAssembly Hosted project with .NET 9:
Note: Make sure .NET 9 is installed. As of this writing, .NET 9 is still in preview, so if you haven’t installed it yet, you’ll need to download and set it up manually.
| |
Or by using the Jetbrains Rirder UI:

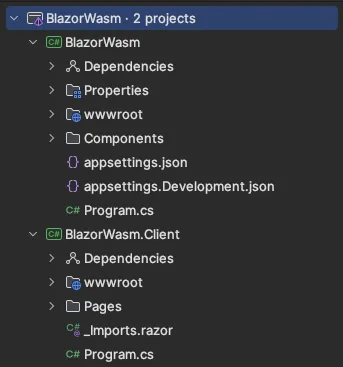
Both ways will create you a solution with some sample files, if chosen, which will look like the following:
Each project has a Program.cs file structured just like other .NET applications. To add dependencies for the business logic, simply update Program.cs in the Server project. For the Client project, we’ll configure an HttpClient in the dependency injection container, making it accessible across components and services.
Project Structure in Blazor Hosted WebAssembly#
Let’s go over the project structure a bit because, admittedly, that was where I initially lost my way, unsure of where and how to start. We won’t go too deep, as most of the core concepts remain consistent across all Blazor projects, but the splitting here is unique.
The project generation command creates two main projects:
- BlazorWasm: This ASP.NET Core server project serves as the Blazor WebAssembly Server Side.
- BlazorWasm.Client: This project is where the Blazor WebAssembly Client Side lives.
Both projects contain a wwwroot folder, where you can serve static files like JavaScript or CSS. To reduce WebAssembly download sizes, place most static files in the wwwroot of the server project—these will only be requested when needed.
In the Server project, you’ll find a Components folder, where basic pages like App.razor define HTML properties, base stylesheets, and similar foundational configurations. Pages, however, are defined in the client project to get prerendered. The page layout is also defined in the client’s MainLayout.razor.
By default, Blazor renders components with prerendering enabled. To allow seamless use of HttpClient for our data requests, we need to change the render mode in App.razor. Without this adjustment, attempting to inject HttpClient could result in an error like:
“Cannot provide a value for property ‘Http’ on type ‘BlazorWasm.Client.Pages.Status’. There is no registered service of type ‘System.Net.Http.HttpClient’.”
To prevent this, open App.razor and modify the <Routes> component to disable prerendering:
| |
With prerendering turned off, the client-side HttpClient is properly recognized in components like Status.razor, allowing data requests without errors.
Adding a New Page and Controller for Server Communication#
Now let’s add a new page and a server-side controller, which the client can access. In the client project, create a new file, for example, Status.razor. This page will eventually display the output of a server request. To make this possible, we need an HttpClient to handle communication.
In Program.cs (Client project), add an HttpClient configured with the backend’s base address:
| |
This preconfigured HttpClient will be added to the Dependency Injection container, ready for use across different pages or services.
Building the Status Page with HttpClient#
In Status.razor, add @inject HttpClient Http at the start of the page to access HttpClient:
| |
This setup uses Http to request data from our server-side WebAssembly project. In this case, OnInitializedAsync fetches data during component initialization, respecting Blazor’s lifecycle.
When we run the application and navigate to /status, the client makes a request to this URL—though it will fail initially because we haven’t yet implemented the server side.
Implementing the Server Side with a Controller#
In Program.cs (Server project), enable controllers by adding the following:
| |
Create a Controllers folder and add a StatusController class with a matching route for client requests:
| |
Pro tip: Since we’re on the server side, we can perform any backend logic here — database requests, Mediator Pattern integrations, or command-handler structures. For a more structured ASP.NET Core Enterprise setup, check out this sample by my colleague Ben Abt.
Adding a Query Parameter#
To accept a query parameter on the Status page, update Status.razor as follows:
| |
Update StatusController to handle the Id parameter:
| |
With this setup, running the app and navigating to /status/123 displays “Status: OK for ID 123.” You can now test and debug both client and server projects together, checking the values at each step.
Wrapping Up: Ready to Dive In?#
Congratulations, you’ve reached the end of this guide on setting up a Blazor WebAssembly hosted project with .NET 9! I hope this walkthrough has given you a solid foundation to start building responsive, client-server applications on Azure.
If you’re ready to put this into action, check out the GitHub repository for this project where you can find the complete source code. Feel free to clone it, experiment with the code, and adjust it to your needs.
Blazor WebAssembly is an exciting framework, and there’s always more to explore. If you have questions, ideas, or feedback, I’d love to hear from you. Drop a comment, reach out on Medium, or open an issue in the GitHub repo.
Thanks for joining me on this adventure in modern web hosting with Blazor WebAssembly! Happy coding!